Vapor Fleece Sublimation Instructions
0 seconds
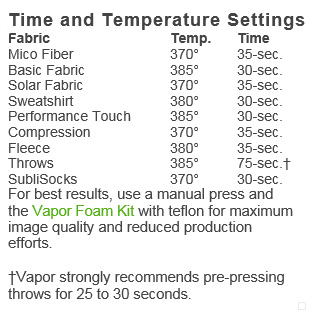
380°F (193°C)
Light
OUR INSTRUCTIONS ARE BASED ON USING A DK20S, DK3110 AND/OR A COUNTER TOP CONVECTION OVEN. TIMES AND TEMPERATURES WILL VARY DEPENDING ON WHICH EQUIPMENT YOU USE.
Detailed Instructions
| Substrate | SLD03, SLD04, SLD05, SLD06 |
|---|---|
| Temperature | 380°F (193°C) |
| Prepress | 5-10 seconds |
| Time (min:sec) | : |
| Pressure | Light |
| Additional | PROSPRAY-II, Lint Roller, Vapor Foam Kit |
| Recommended Paper | TexPrint-R |
| Heat Press Instructions |
Hover transfer under open heat press for 10 seconds to dry excess moisture.  NOTE: The dimensional stability of the fleece fabric makes it very difficult to obtain exactly straight edges, so it is not suitable for full bleed, edge-to-edge printing that utilizes specific graphics. 1) Cover the press with a protective paper sheet. 2) Place the baby blanket, imaging area of the blanket face up, transfer face down on the press and lint roll the entire area that will come into contact by the press. If blanket will not lay flat, use tape to hold down the corners, remove the tape after the pre-press irons it flat. 3) Place a piece of protective paper between the layers of the fabric (if applicable) to prevent the image bleeding through to the other side. 4) Pre-heat. 5) Sticky lint roll the baby blanket while warm and then remove from the press and allow cooling. 6) Lightly mist transfer with DyeTrans Pro Spray. 7) Place the transfer on the fabric, smooth wrinkles. 8) Cover with protective paper and press. Prior to preheating, cover the entire imaging area of the blanket with a single piece of protective paper. The best way to accomplish this is to use uncoated newsprint or non-wax coated butcher paper*. If you do not have these products on hand, then use the largest possible piece of protective paper to cover the entire imaging area. After pre-heating, discard the blanket protective paper. *Gordon Paper Co., Inc. White Tarpon Butcher Paper #661697 (available at Sam's Club) Ink will sublimate to the non-white area of the blanket if you make the image too large. We recommend using the Vignette or Featheredge graphic effects around the image so it blends nicely with the non-imaging portion of the blanket. Small blue or red flecks may appear after pressing. To prevent this apply a sticky lint roller prior to and after pre-heating. Should you see scorching after transfer, spray a 50%/50% mixture of peroxide/distilled water or Oxyclean solution onto the substrate while it is hot. If it has already cooled, then simply reheat and spray. Rinse and dry with a hair dryer. All garments will pill if allowed to dry completely in a dryer. Allow to partially machine dry. Then lay on a flat surface to complete the drying process. Do not line dry. Should you wish to remove pilling, you can use a retail pill shaver, available where fabrics are sold, or a commercial shaver available at most professional laundry and dry cleaning shops. Do not use chlorine bleach on any of these fabrics. For beanies, you can use a piece of cardboard inside and when you turn to do the other side, slightly pull the sublimated side forward on the edges to lessen the line of demarcaction. |
Pressure Cheat Sheet
Contact Level
PSI
Press Dial Level
Average Human Resistance Felt
Contact Pressure
10-15 psi
1 on press dial
where the platen just makes physical contact with product
Light Pressure
20 psi
2 on press dial
resistant with one arm pressing down, easy with two arms
Medium Pressure
40-60 psi
3-5 on press dial
resistant with two arms pressing down, doesn’t require usage of shoulders
Heavy Pressure
80 psi
6 and up on dial
very resistant with two arms pressing down, requires lifting of elbows and shoulders to lock in place