PROSPRAY-II, Lint Roller, Vapor Foam Kit
DyeTrans Multi-Purpose or TexPrint
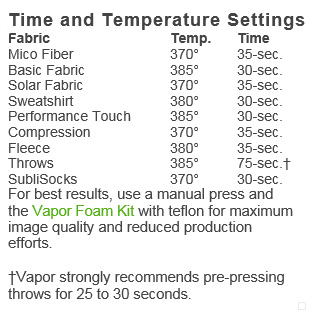
OUR INSTRUCTIONS ARE BASED ON USING A DK20S, DK3110 AND/OR A COUNTER TOP CONVECTION OVEN. TIMES AND TEMPERATURES WILL VARY DEPENDING ON WHICH EQUIPMENT YOU USE.
SECONDS
370°
DEGREES
MEDIUM TO HEAVY
PRESSURE
Hover transfer under open heat press for 10 seconds to dry excess moisture.
If you are doing the the Arm Sleeves Full-Bleed, use two images and make a sandwich, transfer on bottom, then the Sleeve with protective paper inside and the other transfer on top. Be sure to lint roll both sides. You can also tape the sandwich together. Be sure to smooth out all the wrinkles in the Sleeve. Cover with protective paper. This paper must cover the entire area of the material that comes into contact with the heat platen. Press with Temp/Time/Pressure settings listed above. Flip the sandwich over and repeat the press time.
NOTE: The dimensional stability of the fabrics makes it very difficult to obtain exactly straight edges, so it is not easily suitable for full bleed; edge-to-edge printing that utilizes specific graphics. You may try the SubliSocks edge roll technique to blend the transfers from each side and prevent white lines. This involves imprinting one side, then, using a cardboard or foam insert cut to fit, put the item on it and slightly roll all the edges so you can faintly see them as you lay the transfer to imprint the other side.
1) Cover the bottom press platen with a protective paper sheet to prevent bleed from image.
2) Place the sleeve, imaging side face up, on the protective paper and lint roll the entire area that will come into contact by the press.
3) Place a piece of protective paper between the layers of the fabric (if applicable) to prevent the image bleeding through to the other side. You also can use Vapor foam for this purpose.
4) Prepress the fabric, let cool.
5) Lightly mist transfer with DyeTrans Pro Spray.
6) Place the transfer on the fabric, smooth wrinkles.
7) Cover with protective paper. This paper must cover the entire area of the material that comes into contact with the heat platen.
8) Press with Temp/Time/Pressure settings listed above.
Updated: April 30, 2015
